---
title: [Progic] How to Stream Live with StreamYard
description: Learn how to set up a live stream using StreamYard and Progic's streaming server. Connect via RTMP and broadcast content directly to corporate screens through Progic Player.
---
[Skip to content](https://help.progic.com.br/en/how-to-stream-live-with-streamyard#main-content)
- [English](https://help.progic.com.br/en/how-to-stream-live-with-streamyard)
- [Español](https://help.progic.com.br/es/cómo-realizar-una-transmisión-en-vivo-con-streamyard)
- [Português](https://help.progic.com.br/pt/como-fazer-uma-transmissão-ao-vivo-com-streamyard-tv-corporativa)
English
Show submenu for translations

Open main navigation
Close main navigation
- - [English](https://help.progic.com.br/en/how-to-stream-live-with-streamyard)
- [Español](https://help.progic.com.br/es/cómo-realizar-una-transmisión-en-vivo-con-streamyard)
- [Português](https://help.progic.com.br/pt/como-fazer-uma-transmissão-ao-vivo-com-streamyard-tv-corporativa)
English
Show submenu for translations
- [Contact us](https://ty05a.share.hsforms.com/2RIyv8iaWR9qVScnzVXKQSQ)
[Contact us](https://ty05a.share.hsforms.com/2RIyv8iaWR9qVScnzVXKQSQ)
How can we help you?
- There are no suggestions because the search field is empty.
1. [Central de Ajuda](https://help.progic.com.br/en?hsLang=en)
2. [Corporate TV](https://help.progic.com.br/en/corporate-tv?hsLang=en)
3. [Broadcast and Monitoring](https://help.progic.com.br/en/corporate-tv?hsLang=en#broadcast-and-monitoring)
# \[Progic\] How to Stream Live with StreamYard
This guide explains how to configure and start a live stream using **StreamYard**, integrated with the **Progic streaming server**, for display on TVs through **Progic Player**.
### ✅ Prerequisites
Before getting started, you must:
- Have access to **StreamYard**
- Have access to the **Progic platform**
- Have permission to create live streams
- Have at least one **configured and connected player (TV)**
### 🔧 Step 1: Create the Stream in Progic
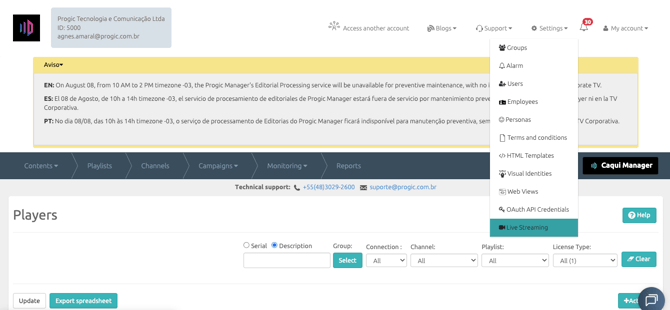
- Access the Progic platform.
- Go to **Live Streaming**.
- Click **Add**.
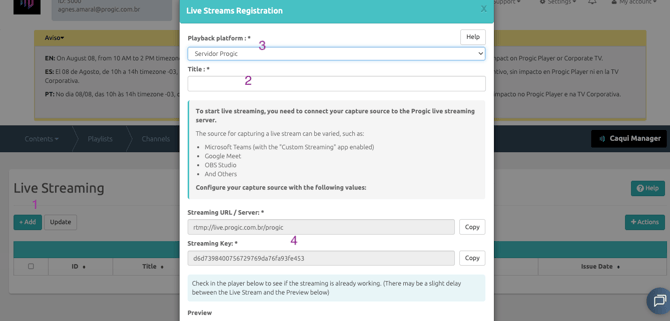
- Fill in the required information.
- Enter the **Stream Title**.
- In **Playback Platform**, select **Progic Server**.
- Copy the displayed information:
- **Server URL (RTMP)**
- **Stream Key**
💡 You will use this information when configuring StreamYard.
---
### 🔧 Step 2: Configure StreamYard
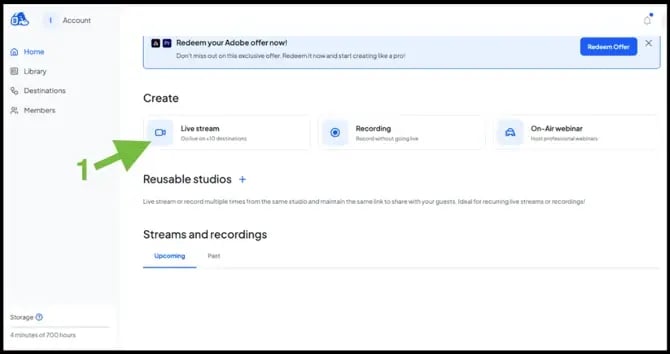
- Access **StreamYard**.
- Click **Create Live Stream**.
Then:
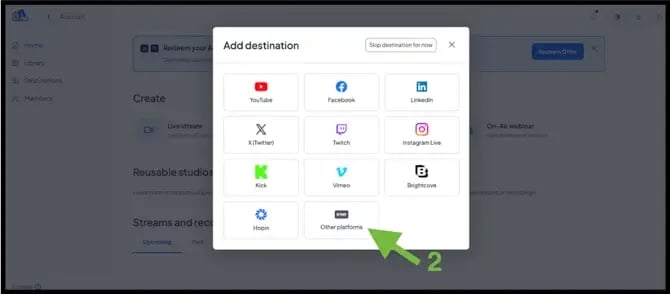
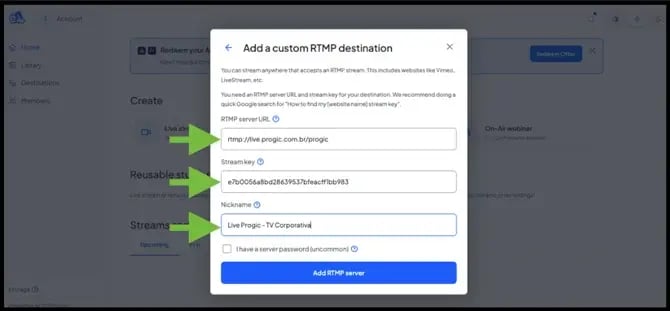
- Under **Add Destination**, select **Other Platforms**.
- Choose **Custom RTMP**.
- Fill in:
- **RTMP Server URL** → paste the Progic URL.
- **Stream Key** → paste the Progic stream key.
- (Optional) Define a name for identification.
- Click **Save**.
💡 StreamYard allows streaming to any RTMP-compatible destination.
---
### ▶️ Start the Stream
In StreamYard:
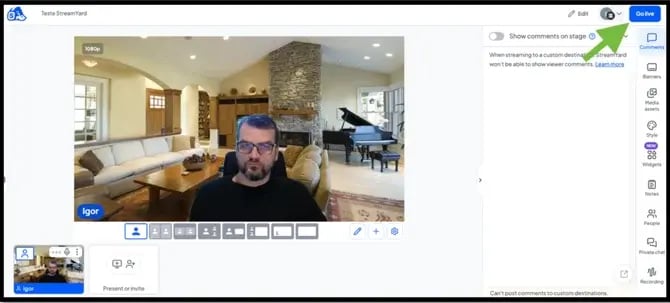
- Enter the studio.
- Click **Go Live**.
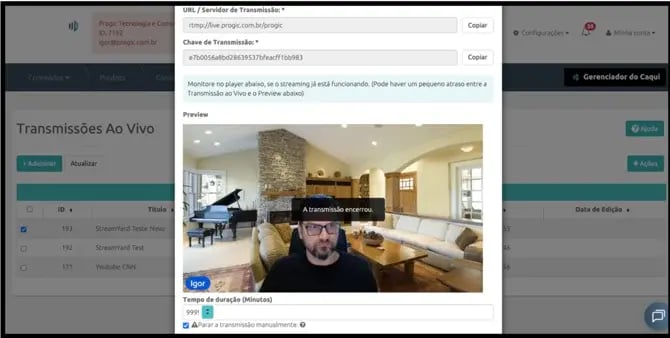
The stream will be sent directly to the Progic server.
---
### 📺 Verify the Stream in Progic
- Open **Players** in Progic.
- Select the desired player.
- Make sure it is:
- ✅ Connected
- ✅ Assigned to the correct channel or playlist
- Confirm that the stream is active.
**✅ Done!**
Your live stream will now be displayed on your corporate TV screens 🎉
---
#### ⚠️ Important Tips
- Always verify that the **Stream Key is correct**.
- Start the stream in StreamYard for it to appear on the screens.
- Confirm that the player is **online**.
- Small delays are normal during live streaming.
- [Corporate TV](https://help.progic.com.br/en/corporate-tv?hsLang=en#main-content)
- [Channels & Campaigns](https://help.progic.com.br/en/corporate-tv?hsLang=en#channels-campaigns)
- [Media and Uploads](https://help.progic.com.br/en/corporate-tv?hsLang=en#media-and-uploads)
- [Creative Resources & Editorial Sections](https://help.progic.com.br/en/corporate-tv?hsLang=en#creative-resources-editorial-sections)
- [Playlists](https://help.progic.com.br/en/corporate-tv?hsLang=en#playlists)
- [Connectivity & Network](https://help.progic.com.br/en/corporate-tv?hsLang=en#connectivity-network)
- [User Management & Access](https://help.progic.com.br/en/corporate-tv?hsLang=en#user-management-access)
- [Manager](https://help.progic.com.br/en/corporate-tv?hsLang=en#manager)
- [Broadcast and Monitoring](https://help.progic.com.br/en/corporate-tv?hsLang=en#broadcast-and-monitoring)
- [Platform](https://help.progic.com.br/en/platform?hsLang=en#main-content)
- [Integration and Security](https://help.progic.com.br/en/platform?hsLang=en#integration-and-security)
- [Settings and Permissions](https://help.progic.com.br/en/platform?hsLang=en#settings-and-permissions)
- [Management and Operations](https://help.progic.com.br/en/platform?hsLang=en#management-and-operations)
- [Tips and Best Practices](https://help.progic.com.br/en/platform?hsLang=en#tips-and-best-practices)
- [Apps](https://help.progic.com.br/en/apps?hsLang=en#main-content)
- [Mobile](https://help.progic.com.br/en/apps?hsLang=en#mobile)
- [Desktop](https://help.progic.com.br/en/apps?hsLang=en#desktop)
[](https://progic.com.br/?utm_source=hubspot)
Copyright © 2026, Progic