
Requirements for Power BI Screen Capture
- Power BI Online: The system must be configured and accessible through Power BI Online.
- User without MFA enabled: The user account used for the capture must not have Multi-Factor Authentication (MFA) enabled.
- Dashboard Permission: The user must have the necessary permissions to access the desired dashboard.
- Note: Progic recommends using a service account with read-only permission for the dashboard.
To access this feature, go to the Content – Sections – Add Section – Screen Capture – Power BI tab.
In the Screen Capture Section configuration screen, the following fields must be completed:
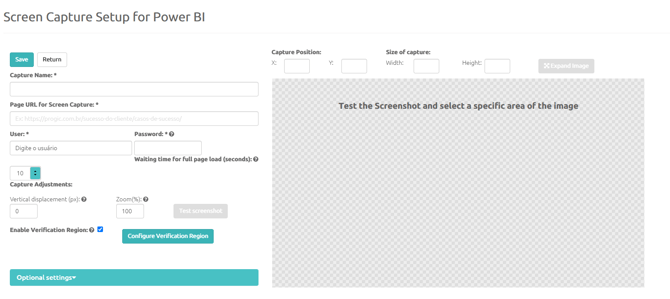
Capture Name: Enter a name for the Screen Capture Section.
Page URL for Screen Capture: Enter the link to the page that will be captured for display.
User: Enter the registered username (required for pages with authenticated access).
Password: Enter the registered password (required for pages with authenticated access). The password will be stored in encrypted form.
Page Load Time: Define the time required for the complete loading of the screen components to be captured. Verify that all elements (images, charts, etc.) are displayed correctly within the specified time.
After entering all the required information, click the “Test Screen Capture” button. The screen capture will be displayed so that you can select the position and dimensions of the image crop. You can enlarge the image using the button available above the capture to improve the selection of the desired area.